
June 16, 2015
ESLint – Customizable JavaScript linting tool (2)
In this second part of our article about ESLint we will dive into the most interesting feature of this tool: its customizability.
You can find the first part of this article here.
As background’s knowledge, in our introduction to the linting tools, we have discussed the most interesting linters and their pros and contras. After such overview we have started deepening into the initial features of ESLint, describing how to get started with the tool and how to lint our first JavaScript file. Hereby, alas, we have faced some difficulties in linting a JavaScript file because of the default settings of ESLint. This second part of the article explains exactly how to workaround such issue, exploiting the best of ESLint, via its customizability.
Table of Contents
- ESLint – Fully customizable code quality checker (part 2)
- Rule reset and custom configuration
- ESLint config initialize
- Live Linting with an IDE
- Our first custom rule
- Conclusions
ESLint – Fully customizable code quality checker (part 2)
In the following sections we will recovery the examples of the first part of the article and we will go ahead with the description of ESLint. Firstly we will discuss how to initialize our linting environment, in order to customize ESLint. Then we will discuss how to build our own linting rule’s configuration set. After that, we will introduce a linting plugin, with which you can run ESLint “live”, within your IDE. As completion of our discussion we will introduce the building of a completely customized linting rule and how to activate it.
Rule reset and custom configuration
The behavior of ESLint can be controlled via the specification of a config file that can be proper of each single project. This means that, within you project you can specify the way ESLint works and, of course, adjust this configuration to fit the project itself.
[As info, ESLint can be configured also via JavaScript comments, directly in your code, but we prefer the config file, since it is a global customization]
The configuration file, as we can read from the ESLint webpage, can be a JSON or YAML file. This can be in the form of an .eslintrc file or an eslintConfig field in a package.json file, both of which ESLint will look for and read automatically.
The effect of the configuration file is important. If you place a config in a folder, then ESLint will apply this to each file in the directory and all related subdirectories. But, pay attention, ESLint will always still consider its default configuration file! Even in presence of a custom one. This means that, if you configure a rule in your custom config file, then it will overwrite the default one. But, if you don´t mention a rule in your config, and this rule is active in the default, it will be anyway considered and computed.
If you do not want ESLint to consider the default rules anymore, then you have three options. The first is to manually edit the global configuration file, toggling each rule that you don’t need. But doing this way you will edit the global behavior of the tool. The second is to use the following command:
|
1 2 |
eslint --reset /*Set all default rules to off - default: false*/ |
But, like the first possibility, also this one is a no-return option, and you will be always required to configure ESLint for each occasion.
Or, in alternative, you can use the following source as boilerplate to setup your own config: ESLint_Rule_Reset
This starter configuration file contains the most of the default rules, and it has them already set to “0”, in order to give you free hand about what to do in your customization. Just copy it and use it as .eslintrc of your project!
ESLint config initialize
Hence, there are two best ways to start your customized setting in your project. The first is to copy the ESLint resetter file and use it within your project. The second is to write your own from scratch. In this last case, ESLint comes into help with a CLI command that creates the .eslintrc file for you:
|
1 2 3 4 5 6 7 8 9 10 |
MacBook-Pro-Gianluca:$ eslint --init ? What style of indentation do you use? Spaces ? What quotes do you use for strings? Double ? What line endings do you use? Unix ? Do you require semicolons? Yes ? Are you using ECMAScript 6 features? No ? Where will your code run? Browser ? Do you use JSX? No ? What format do you want your config file to be in? JSON Successfully created .eslintrc file in /Users/Desktop/testtest |
The –init option prompts you a simple 8-steps wizard with some basilar questions about your usage of JavaScript and ESLint. After a simple set of commands you will have your .eslintrc file, which will look like this:
|
1 2 3 4 5 6 7 8 9 10 11 12 13 14 15 16 17 18 19 20 21 22 23 |
{ "rules": { "indent": [ 2, 4 ], "quotes": [ 2, "double" ], "linebreak-style": [ 2, "unix" ], "semi": [ 2, "always" ] }, "env": { "browser": true } } |
Starting from this basic configuration you can toggle the rules you need and adjust each setting to fit your requirements.
Live Linting with an IDE
As complementary possibility, ESLint is able to run “live” within your editor or IDE, in order to integrate warnings and errors with the standard ones, coming from your program. As example of this, we consider the configuration of ESLint with the IntelliJ IDEA IDE.
We suppose that you have already downloaded NodeJS and the ESLint package via npm. At this point, go to IntelliJ IDEA>Preferences (or, under MacOS, just hit Command+,).
The preferences panel enables you (up.right) to search in the preferences by a keyword: type “eslint”.
Then you will be prompted to a screen similar to the one below:
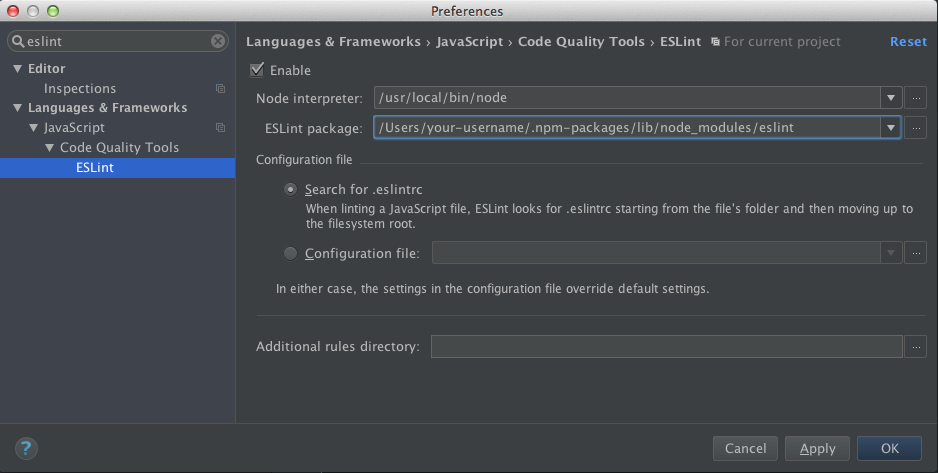
Now:
- Enable ESLint as Code Quality tool by toggling the checkbox.
- Check the path of your NodeJS interpreter (the default should be already configured)
- Tell IntelliJ where to find the ESLint package: if you downloaded it in the standard npm package folder, than copy the following path (don´t forget to replace your username):
/Users/your-username/.npm-packages/lib/node_modules/eslint - If you want to specify a different configuration file you can either let ESLint looking automatically for the next .eslintrc file or specify one by yourself (this last option is useful when the .eslinrc file is in a path which is not on the road from the actual path to the root)
- Note that, as already discussed, in either case, the settings in the configuration file will override the ESLint default settings.
- In the last field you can specify a folder that contains custom rules. Such rules can be project specific and can be included in the ESLint workflow for specific need (more in the next paragraph).
After this configuration, ESLint will start running in your IDE, checking your JavaScript “live”.
Our first custom rule
The most interesting feature of ESLint is, undoubtedly, the possibility to write own rules to validate and correct our code. ESLint comes with a simple and clear set of APIs to let you build your rule within a moment. What is important is just to follow the correct format ESLint understands!
A good starting point to write our first rule is the following link to the ESLint page: Custom Rules. Here we can find the basic specification of a rule; by joining such code with our (consolidated) knowledge of ASTs the rule will be really easy to write and understand.
In order to experiment the process of including a new rule, we make a concrete example. Let´s resume the rule of some paragraphs ago: “if the name of a variable starts with a capital letter then issue a warning”. This rule can also be considered useless, but, please, take it as example for the general concept.
Now we can start step-by-step.
- The first point is to decide where to put our rules. In this regard we need to consider that we have two options. Either we create a custom folder (in our project or somewhere else) where we put our rules, or we write directly in the global rules’ directory of ESLint. The first option is really good if you will share your rules with your projects (say, with other co-workers) and if you want to make your rules not globally available. The second option is perfect if your rules shall be specific of your global environment. In the rest of the example we will consider the first option, because it involves more settings, since the second road consider the rule as if it would be built in the default of ESLint.
- Then, we create our folder, say
eslintCustomRules/within our project and, there, a file namedmy-rule-no-capital.js - Within our rule´s file a good starting point can be the following code:
123456789101112131415161718192021222324/*** @fileoverview A new rule for our ESLint - Preventing usage of capitalized variables* @author Gianluca Porcino* @copyright 2015 Gianluca Porcino. All rights reserved.*/"use strict";//------------------------------------------------------------------------------// Rule Definition//------------------------------------------------------------------------------module.exports = function(context) {return {"Interface": function(node) {// do something with node}};};module.exports.schema = [// JSON Schema for rule options goes here];
The most interesting elements in this code are, of course,contextandnode. Thecontextobject contains additional functionalities that are helpful in the construction of a rule, letting you select and operate on each element of an AST´snode. The “context” of a rule is its environment and, as discussed, it is the subset the AST’snodesthat we can select via theinterface. The interface´s name, for us, is easy to locate, since we can get it either from the SpiderMonkey´s ESTree specifications, or from the visualization of our AST´s code in the visualizer (as discussed some paragraphs ago). In the case of our example, the interface of our interest is the “Identifier”, since we need to deal with the name of the variables.
123return {"Identifier": applyMyRule}; - At this point, we need to write our rule in the form of the function
applyMyRule
123456789101112131415161718192021222324252627282930313233343536/*** @fileoverview A new rule for our ESLint - Preventing usage of capitalized variables* @author Gianluca Porcino* @copyright 2015 Gianluca Porcino. All rights reserved.*/"use strict";//------------------------------------------------------------------------------// Rule Definition//------------------------------------------------------------------------------module.exports = function(context) {var MESSAGE = "Variable Capitalized?!";function isCapital(key){return ( /^[A-Z]/.test( key) );}function applyMyRule (node) {if(isCapital(node.name)){context.report(node, MESSAGE, { identifier: node.name });};}return {"Identifier": applyMyRule};};module.exports.schema = [// JSON Schema for rule options goes here];
In this code,MESSAGEis the detailed error (or warning) that ESLint will raise.isCapitalis simply a JavaScript function to control if a string starts with a capital letter via a regular expression. The most important element is thecontext.report, which is a method of the context able to detail the error with theMESSAGEwe provided and the pointer to the node´s line in the code. - The next step is to load your customized rule. If we are using the Live Code plugin in IntelliJ IDEA, we can specify our
eslintCustomRules/folder in the “Additional rules directory” field (and our rule will be immediately available to be included in the configuration file). If we are not using IntelliJ we can however specify the rule´s folder via a CLI command:
1eslint --rulesdir ~/Code/.../eslintCustomRules/ file.js
In order to load our rule in our config, all we need is the name of our rule´s file:my-rule-no-capital.js. Then we can load the rule in the config file as follows:
123"rules": {"my-rule-no-capital": 1} - Then we can test our rule, for instance against the following code
1234567891011121314151617<file.js>var A = 10,b = 12,c;if(A < b){c = "b is bigger than a";}else{c = "a is bigger than b";}console.log(c);------$ eslint --rulesdir ~/Code/.../eslintCustomRules/ file.js1:4 warning Variable Capitalized?! my-rule-no-capital4:3 warning Variable Capitalized?! my-rule-no-capital2 problems (0 errors, 2 warnings)
Which shows the rule in action.
Conclusions
ESLint is a great tool. It takes a little bit of setting to use it productively, but this depends upon the multitude of code styles that exist. The possibility to configure each rule and to write new ones from scratch lets a great degree of freedom to each programmer.
Admin Admin
Developer at 