
June 9, 2015
ESLint – Customizable JavaScript linting tool (1)
Historically, “to lint“ is an expression that denotes the process of flagging and highlighting some inadequate and error-prone construct in C-like language source code. After the emerging of heterogeneous software languages, the term has been universally adopted to generally indicate tools that are able to herald suspicious usages in software.
This article is the first of a series of two, whose target is that of discussing the advantages of a JavaScript linter, analyzing ESLint and deepening its features and capabilities.
In this first part we start by paying attention to the most interesting JavaScript linting tools actually available. After such overview we deepen the focal topic of the article: ESLint. In this regard, we make a short coarse-grained comparison of this tool with respect to the competitors; then we dive into its structure, by analyzing the way it works and the way we can exploit its features to improve our code quality.
At the end of this first part of the article we will have a comprehensive perspective of ESLint and we will be able to start it and use it to correct our JavaScript files. In the next week, in the second part, we will discuss the most interesting feature of this tool, that is, its customizability and the possibility to define each aspect of its workflow.
Table of contents
- Overview of the JS Linters
- JSLint
- JSCS
- JSHint
- ESLint: our choice!
- ESLint – Fully customizable code quality checker (part 1)
- Abstract Syntax Tree (AST) and Espree
- AST Visualization
- ESLint – Getting started
- Abstract Syntax Tree (AST) and Espree
- Conclusions
Overview of the JS Linters
With respect to the JavaScript language, the ‘linting’ process aids the programmer in the observance of styling and functional guidelines, with the target of both enforcing the global code quality and reducing the time needed to locate errors in the program. A linting software can be friendly considered like someone who takes care of your code, by correcting your mistakes and hinting the best way to respect the structural guideline of the project you are involved in.
A linter mainly bases upon the concept of rule. A rule is the minimal element against which a given portion of code can be analyzed. The syntax of a rule straightly depends on the way the linter has been built. However, the content of a rule can be trivially abstracted and considered as a generic conditional statement: if a variable is undefined then is an error (for instance). A linter uses a parser to get each piece of code and proves its quality against a set of rules, which can be fixed and/or user customizable.
The way a linter can be incorporated in the programming´s workflow depends on your purposes: you can use it just to check a single .js file “on the fly”, to correct your entire project, or as live code quality tool (by integrating it within your preferred IDE). The most common way to install a JavaScript linter is, today, via the NodeJS’s packet manager (npm), making it globally available within your environment via command line.
In the actual JavaScript panorama, the most known and widespread linting tools are:
Each tool has its pros and contras and, depending on your requirements, may represent a suitable choice for your project, in order to lighten the cumbersome task of correcting and optimizing your JavaScript code.
In the following paragraphs we take into account the main features of the tools listed above, aiming at highlighting their pros and contras. Indeed, while describing ESLint, we will often refer to the contras of the competitors, in order to motivate the choice of this tool as better one.
JSLint
“In the beginning was JSLint”. JSLint is one of the oldest comprehensive tools able to aid the linting of a JavaScript file. Its intent is to formalize a wide set of fixed JavaScript best practices (“the good parts”), that the author of the tool (Douglas Crockford) has considered relevant, into a linter able to correct the code by parsing it. The main pro of JSLint is its simplicity: just install it and check your code, without any preliminary setting or adjustment. The tool is also integrable with the most of the modern IDEs, in order to let you lint while programming. The main and harder contra is that it´s strictly configurable (just a bunch of options) and absolutely not customizable: if you agree with “the good parts” of Mr. Crockford well, otherwise there is no way to modify the behavior of the tool. The topic of our article focuses also on the customizability of the linting tools and, since JSLint lacks of this feature and, it will not be further taken into account.
JSCS
At the opposite of JSLint, JSCS has no preconfigured behavior: it doesn’t check the code until you provide a proper configuration. In this, JSCS makes available a concrete customizability, by providing both a set of “scaffolded” presets and the possibility of mixing them to fit your necessity. This tool is based on the concept of plugin, that is, it allows the extension of the linting rules via external, user-defined, elements. Those elements are both writable from scratch or can represent an adjustment of the default ones, in any case they are always intended to increase the tool´s capabilities with respect of your programming style. JSCS comes as NodeJs’s package and it is configurable to fit the most of the modern IDEs and Code Editors. By nature, JSCS is a code style checker, which means that it’s not capable of catching and revealing bugs or errors in code. If you need to detect, for instance, problems related with undefined elements, illegal arguments or inconsistent functions then JSCS is not suitable for your purposes.
JSHint
Maybe the most known and widespread linter tool today. It relies on the basic skeleton of JSLint and expands its structure and capabilities. JSHint provides a very dynamic environment, allowing you to enable or disable any of its hundreds rules, by editing its configuration file. The presence of a config file itself eases the applicability of the tool in broad projects, because it allows the customization of the hinting rules with respect of your topical necessity. As default, the tool comes with a basic configuration: it means that you (almost) necessary need to play a bit with its structure before being completely productive. The main lack of the tool is the incapability of extending its potential with custom rules.
ESLint: our choice!
Why is it our choice? Mainly because of its most important feature: it is 100% customizable. The basic reason why ESLint exists (in substance) is because its creator, after using JSHint for a while, didn’t accepted the impossibility of easily writing his own rules and, therefore, decided to build a tool able to give the programmer…the ability to program its linter by itself. In comparison with JSCS and JSHint, ESLint is the first tool able to provide a solid set of APIs to expand the default rule´s set and fit any kind of necessities. As we will successively detail, ESLint exploits the AST (Abstract Syntax Tree) representation of the parsed code, which, in turn, is based on a fixed and recognized specification (ESTree), that comes directly from the Mozilla’s SpiderMonkey engine’s JavaScript parser. As summary of our brief comparison we can say that: JSCS focuses only on the code´s style (ESLint is able to perform what JSCS does and more), while JSHint is not customizable (ESLint can what also JSHint can, plus customization).
In the rest of the article we will consider only ESLint, trying to highlight its customizability and the good theoretical foundations upon which it is build.
ESLint – Fully customizable code quality checker
ESLint is an open source JavaScript linting utility, originally created by Nicholas C. Zakas in June 2013. As we can read from the webpage of the ESLint project:
The primary reason ESLint was created was to allow developers to create their own linting rules. ESLint is designed to have all rules completely pluggable. The default rules are written just like any plugin rules would be. They can all follow the same pattern, both for the rules themselves as well as tests. While ESLint will ship with some built-in rules to make it useful from the start, you’ll be able to dynamically load rules at any point in time.
In the rest of the article we will see how ESLint works and how to configure it in order to get the best from the tool. We will also present and discuss a small custom rule, written to test the capabilities of the linter.
Abstract Syntax Tree (AST) and Espree
What makes ESLint a great tool is its capability to exploit a friendly, jet complex, representation of the code to be parsed: the Abstract Syntax Tree. An AST is a data structure, widely used in programming compilers, due to its property of representing the structure of program code. ASTs are often the result of the syntax analysis of the code by a compiler and often serves as an intermediate representation of the program through several stages that the compiler requires. The term “abstract” indicates the nature of the representation, which is intentionally not completely consistent with the source code: parenthesis are mostly implicit and some conditional statements are often boxed into a single node unit (instead of explicitly being pictured by a node for each statement´s step). It is exactly against such nodes that ESLint proves the rules that we activate! In the next image we have an example of what an AST looks like.
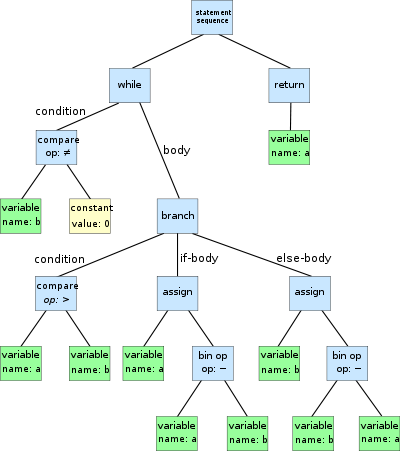
This AST (from Wikipedia) represents the following code (the Euclidean Algorithm):
|
1 2 3 4 5 6 |
while b ≠ 0 if a > b a := a − b else b := b − a return a |
Of course, the code validation takes place by filtering nodes of a certain kind and validating them against a certain subset of rules that has a logical adjacency with such nodes. In order to better understand this concept we can suppose to want to validate the name of the variables of the example against the following rule: “if the name starts with a capital letter then issue a warning”. What ESLint does is, given the AST, firstly to filter the nodes by type and, for our rule, consider only those labeled as “Variable”, then it applies the given rule.
But how can ESLint obtain the AST representation of the code we want to lint?
ESLint uses a parser engine that is able to produce the AST structure: Espree. This engine is born as fork of another tool (Esprima) and its target is that of fully supporting the purposes of ESLint, by fitting its architecture and workflow. The main feature of Espree is the implementation of the ESTree AST format, that is, an abstract representation of the ECMAScript code that follows the standards of the Mozilla´s SpiderMonkey JS Engine.
A way to better understand this dependancies and to focus on how ESLint works is, probably, to look at it as a chain of elements, each of them interconnected with the successive in a top-down approach. You have your code, right? Then ESLint shall be able to correct it… right? But first of all it needs to figure out how this code is structured. In order to do that it calls Espree (which, ideally, could also be independent from ESLint). Espree builds an AST, right? but with which kind of parameters? which standard? ESTree is the standard (the specification) in which the AST is computed. Finally, which is the origin of this standard? ESTree comes from “far away” and, precisely, from the way the Mozilla interprets the JavaScript language with its SpiderMonkey original JS Engine.
To be able to write ESLint´s rules we need some knowledge of the ESTree´s structure. This, because each rule applies, as said, to a subset of the nodes of the AST. In order to identify such subset we need to know the name of its Interface. The complete standard´s specification can be found on the ESTree website, but a funny way to understand the interfaces and to locate the AST´s nodes that we want to lint is to visualize them!
AST Visualization
Wondering on the web, seeking for a tool able to ease the understanding of AST, what we found is the following: JavaScript AST Visualizer. This is a demo application of an interesting JS diagramming library (JointJS). The JS AST visualizer aids us in understanding and locating the part of the code our custom rule should be validated against. This visualizer uses Esprima for the visualization: it means that the tree will be exactly in the same form of the AST produced by Espree. (Espree is a fork of Esprima, as said, and their differences are operative, not structurally, since they are both ESTree-compliant).
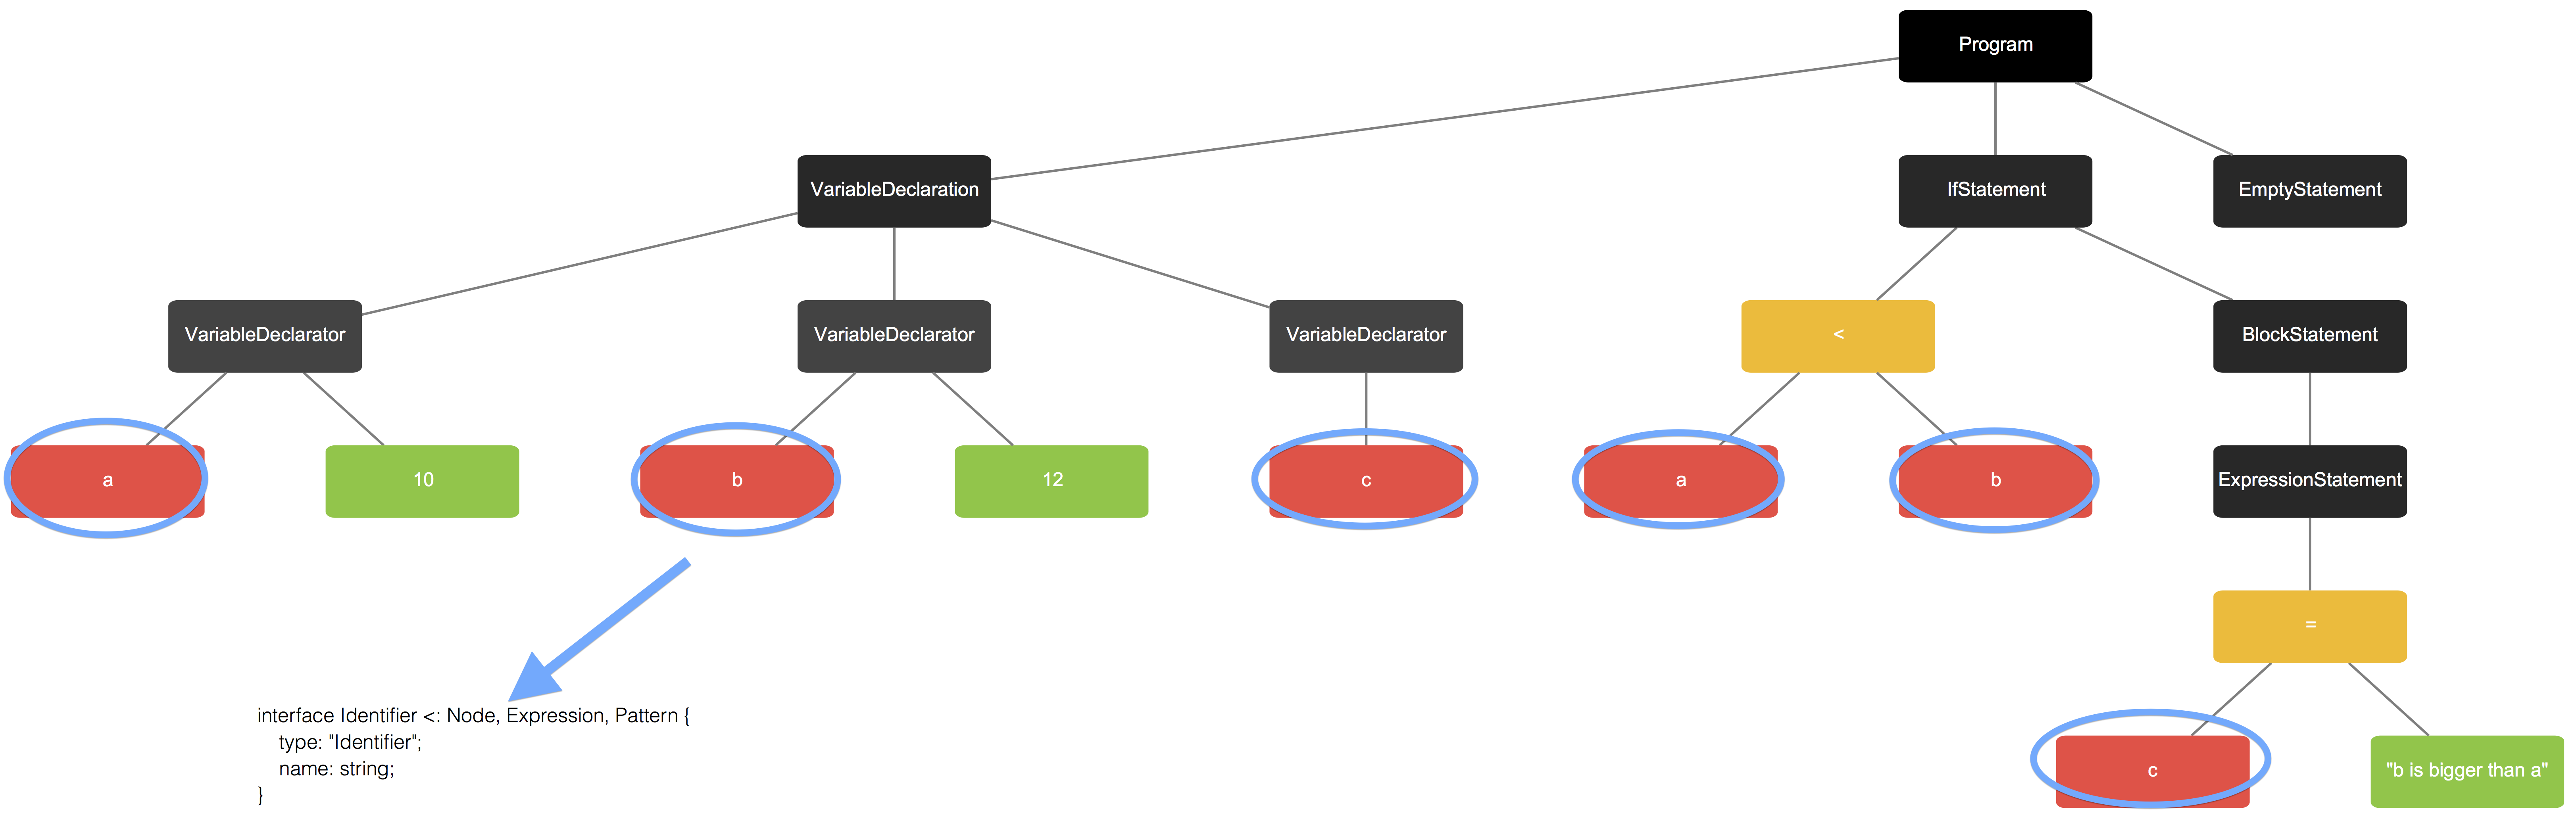
In order to understand the entire picture, we can try to visualize the AST of the following code (which ESLint would lint with errors, like the unused variable “c”):
|
1 2 3 4 5 6 7 8 |
var a = 10, b = 12, c; if(a<b){ c="b is bigger than a"; }else{ c="a is bigger than b" }; |
and we can try to locate the interface that ESLint would need to filter in order to apply the following rule: “if the name of a variable starts with a capital letter then issue a warning”.
From the following image we can see how the AST can be represented. In the picture (with mouseover) we see the node element that indicates a variable, that is (trivially) “Identifier”. Hence, our rule has to be applied to that subset of AST´s nodes that are to represents the Identifiers of the code. This same procedure can be repeated in order to identify other Interfaces. For Example, each block of code in which something appears like a string is indicated in the AST specifications as a “Literal”; each “If Condition” as “IfStatement” and so on.
This fundamental part of backgrounding knowledge will help us building a new ESLint rule without any big difficulties.
But before doing this, we need to operatively start to use ESLint!
ESLint – Getting started
In the following part of the article we try to point out the operative application of ESLint. As Environment for our tests we use a MacOS with OSX Mountain Lion (the same is also for the newer versions) and IntelliJ IDEA as IDE (the availability of the plugins for other IDEs depends on the ESLint development: check the project’s website for more infos).
ESLint is born to be used via CLI and its usage depends on the installation of the ESLint’s package via the NodeJS’s npm (the package manager for node).
To perform the installation of ESLint as Global application you may run this command from any terminal:
|
1 |
npm i -g eslint |
Then, you are ready to lint, with the following command:
|
1 |
eslint [options] [file|dir]* |
For all the options that the CLI utility makes available, please check the website here.
The installation of ESLint as CLI application creates a folder eslint/ in your .npm-packages/lib/node_modules path. In this folder, under the path eslint/lib/rules/ you can find the collection of rules that ESLint has, per default.
The most interesting file in the ESLint folder is, for our purposes, the eslint.json file that is under eslint/configuration/. If you take a look at its content, you will find the following entries:
|
1 2 3 4 5 6 7 8 9 10 11 12 13 14 15 |
{ "ecmaFeatures": {}, "parser": "espree", "env": { "browser": false, "node": false, "amd": false, "mocha": false, "jasmine": false }, "rules": { ............... } } |
Let’s have a look at their meaning.
ecmaFeatures: within this key you can configure the behavior of ESLint in relationship with the ECMAScript version that you are using. You can, for instance, edit the behavior of ESLint in presence of functions whose meaning in ECMAScript 6 is different or peculiar, like “default function parameters” or “templateString“. Each entry is in the format “key:boolean” (for example, “templateStrings:true”).parser: you can, in future, consider to use another parser to generate the AST and to grab your code. By default the parser is, as discussed, Espree (other compatible parser are Esprima-Fb and Babel-ESLint).env: a fundamental parameter in the application of ESLint is the “place” where lives the file you want to lint. An environment defines both the predefined global variables that ESLint will automatically recognize, as well as which rule should be on or off by default. The env Browser, for instance, enables the acceptance of common browser global variables or functions (window, console…). Each entry is in the format “key:boolean” (for example, “browser:true”).rules: here is where you can configure…every rule! Each rule is, in the ESLint structure, independent and you can enable it as you need. Each rule is an entry in the form “key:[value, param]”. The param is an optional parameter that we can pass to the rule in order to specify a particular behavior for some rules. The value can be selected between three different states: “0”, “1”, “2”. Each state indicates what ESLint will do when it meets a node in the AST that has a logical adjacency with the rule.- “0” : the rule is set as inactive (…it seems trivial, but will be important when we will discuss the custom configuration).
- “1” : the rule is active and ESLint will generate a Warning if the node analyzed doesn’t meet the rule’s requirements.
- “2” : the rule is active and ESLint will generate an Error if the node analyzed doesn’t meet the rule’s requirements.
An example of rules can be the following:
|
1 2 3 4 5 |
{ "rules": { "quotes": [2, "double"] } } |
This rule means: EsLint, please, check the AST of my code for nodes that are “Literal” (Interface:Literal). If one of this nodes contain quotes, as value, then check this quotes. At the and, if you ensure that I am so forgetful that I have used a single quote somewhere (‘), than please generate an Error!
Consider that ESLint comes with a bunch of pre-activated rules, you may need to edit those entries before being productive with the tool, because the most of them can be really subjective an related with code style.
Es example of that, we can see what happens if we lint the following code using ESLint out-of-the-box:
|
1 2 3 4 5 6 7 8 9 10 11 12 13 14 15 16 17 |
<file.js> var a = 10, b = 12, c; if(a < b){ c = "b is bigger than a"; }else{ c = "a is bigger than b"; } console.log(c); ------ $ eslint file.js 9:0 error Unexpected console statement no-console 9:0 error "console" is not defined no-undef ✖ 2 problems (2 errors, 0 warnings) |
The output of the execution of ESLint reports the line:column pointer to your code where the issue is revealed, the kind of the issue (Warning/Error), the error message and the rule that has detected such issue. This last element helps us detecting the rule and, in this case, to edit its behavior.
…As expected, ESLint does not accept “console”, because a rule, active for default (“no-console”) prevents the usage of the “console” method (since it isn´t a best practice in code´s production). ESLint also does not understand “console”, since we didn’t enabled the usage in browser (as seen before).
Conclusions
The best way to customize the behavior of ESLint is, as we can deduce from the results of our first tests, to create our own configuration file (or to completely overwrite the existing one). This will be the first topic of the next part of this article. There, we will also discuss the advanced configuration of ESLint and the construction of a fully customized linting rule.
Admin Admin
Developer at 